
Get help here creating and configuring your security credentials for your Amazon Web Services Command Line Interface (AWS CLI) and AWS Cloud Development Kit Command Line Interface (AWS CDK CLI).

There are two reasons you might be here:
- You build AWS infrastructure using the AWS CDK and deploy via the AWS CDK CLI.
- You use the AWS CLI to interact with AWS services.
You’ll need to configure security credentials on your local machine to use either of these CLIs.
Defining the appropriate security credentials for your CLIs identifies you (e.g., the IAM User you’ve defined for local development) and specifies what you’re allowed to do via that IAM User (creating and deploying a CDK CloudFormation Stack or querying a DynamoDB table, for example).
What’s our goal?
The goal of this article is to help you create an AWS Access Key so you can use it to configure the security credentials on your local machine.
I recall this being a bit confusing when I first starting using the AWS CLI and AWS CDK CLI several years ago, so hopefully adding some visuals here will help you out.
This is aimed at individual developers who want to use, build and deploy AWS resources using these two CLIs.
Note: Using an AWS Access Key without a session token is considered a long-term security credential and is officially not recommended by AWS. This is opposed to short-term security credential usage, which is generally a best practice. Follow me for a future article on security credential best practices.
There is a way to get an AWS Access Key with a session token. This is a more involved process that requires use of the IAM Identity Center and is out of scope for this article. https://docs.aws.amazon.com/cli/latest/userguide/cli-chap-authentication.html
Prerequisites
1. You have an AWS Account. Register if you need one — it’s free.
2. You have an IAM User in the AWS Account that has the permissions you’ll need for development. You can find how to create an IAM User here.
3. You have the latest AWS CLI and/or AWS CDK CLI is installed on you local machine. You can use the instructions here for the AWS CLI or here for AWS CDK CLI if you need to install either.
What We’ll Accomplish
If we try and run any CLI commands in our terminal now we’ll get an error because the CLI does not have information on who we are or the permissions to access the account.
Example error message.

How Do We Fix This?
We’ll want to update two files named, credentials and config. Where are these files? I’ll show you in just a bit.
We can easily update these two files this by running the command aws configure in our terminal. Once we run this command, we’re going to be asked to add the following 4 fields. Let’s get them now.
sara-builds@37trJ2s7k testCDK % aws configure
AWS Access Key ID [None]:
AWS Secret Access Key [None]:
Default region name [None]:
Default output format [None]:
Step 1 — Create the AWS Access Key Using the AWS Console
First, let’s create our AWS Access Key. I’m assuming that you do not have one already.
Navigate to the AWS Management Console in your browser and sign-in. Make sure you’re signed-in with a user that has the permissions to create an AWS Access Key.
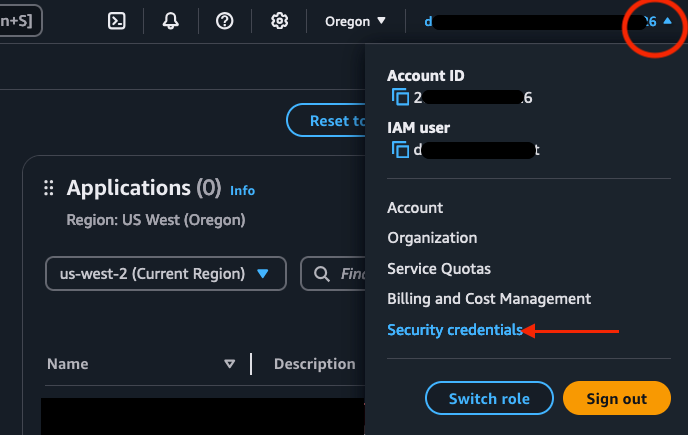
Once signed-in, go to ‘Security credentials’ under the user drop down on the top right Navigation in the UI.
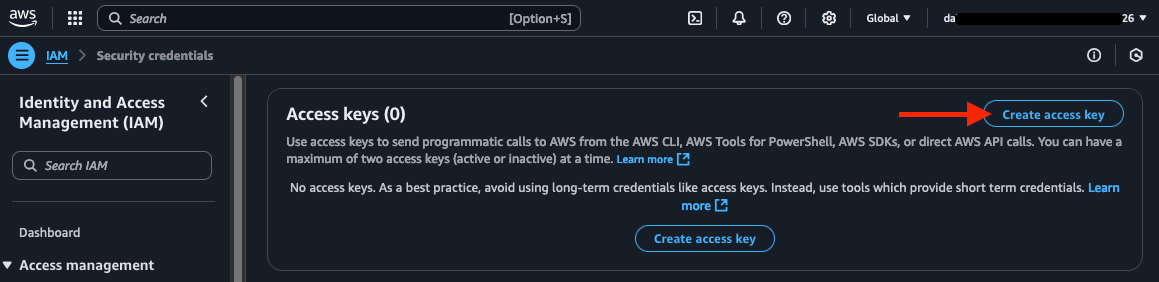
Next, click on ‘Create access key’.
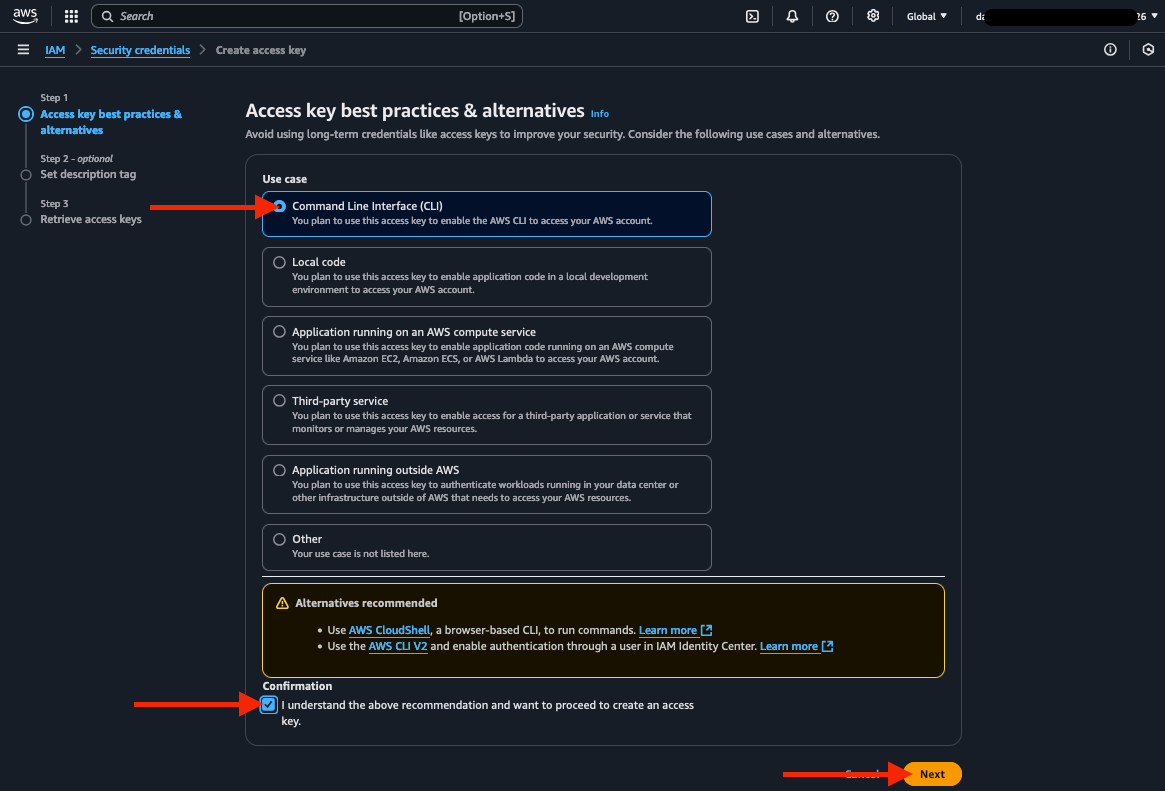
Next, select the ‘Command Line Interface’ option.
There are some warnings here about it not being the best way. This is related to the option being a long-term credential.
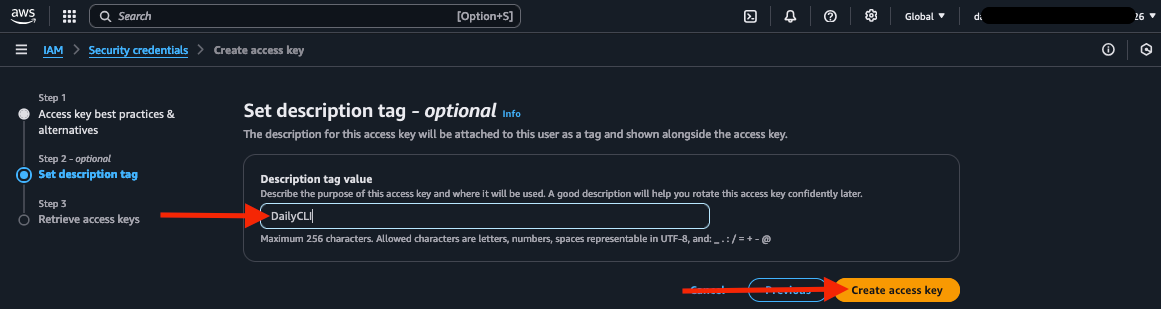
Next, add a description tag and click, ‘Create access key’.
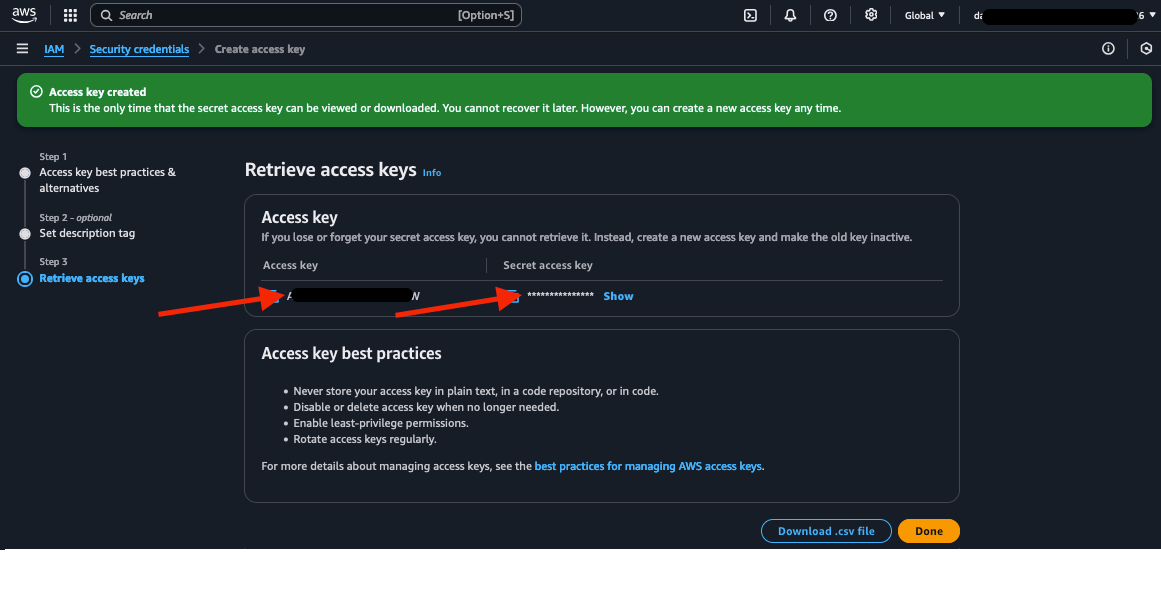
Finally, your access key is created — but don’t click Done or close this window yet. Move to Step 2.
Step 2 — Run aws configure on the Command Line
You now have your AWS Access Key ID and AWS Secret Access Key from Step 1 above.
Run aws configure in your terminal. The following prompts on lines 2–5 in the image below will come up, one by one. Enter the appropriate data in each one, and hit Enter or Return after each entry.
1 sara-builds@37trJ2s7k ~ % aws configure
2 AWS Access Key ID [None]:
3 AWS Secret Access Key [None]:
4 Default region name [None]:
5 Default output format [None]:
AWS Access Key ID
Put your Access Key that you created at the end of Step 1 here. This should be the shorter of the two values that you have on your AWS Console UI.
AWS Secret Access Key
Put your Secret Access Key that you created at the end of Step 1 here. This should be the longer of the two values that you have on your AWS Console UI.
Default region name
For the Default region name, this can be any AWS region. You can find a list of AWS Regions here. I’m using us-west-2.
Default output format
You can find a list of Default output format options here. My preference is json.
Step 3 — Confirm that the Config and Credentials Files are Updated
After running aws configure and populating the 4 fields, our two files config and credentials are populated with the credentials required to deploy our stack.
The location of these files is different between Mac and Windows. You can find the default location of these shared files for both platforms here.
I’m using Mac for this tutorial, so I’ll give my file path below. This is what the updated credentials file should now look like.
Mac path: ~/.aws/credentials
[default]
aws_access_key_id = A******************W
aws_secret_access_key = I**************************************t
This is what the updated config file should now look like.
Mac path: ~/.aws/config
[default]
region = us-west-2
output = json
Step 4 — Try to Use the AWS CLI
Now that your credentials are set up, let’s use the AWS CLI to retrieve the IAM User that we used to create the Access Key. This will require the user to have the permission iam:GetUser added for them, if it is not already.
Of course you can use a different AWS CLI command to test your new credentials based on the permissions you’ve already provided your user.

Hopefully this article has helped get you up and running using the AWS CLIs. Please let me know in the comments if you have any questions!
Checkout my original post on Medium here.
