

Have you wanted to try out your new API after a creating an AWS DynamoDB (DDB) table but didn’t have any data populated in it yet? Have you wanted to stop manually adding data to your Dynamo DB Tables through the AWS Console? Try these 3 ways to populate your DynamoDB tables with data so you can do more building and less manual data populating.
Sure there are ways to add data to your DynamoDB table using the AWS Console in your browser, but you’re a developer — let’s solve this problem programmatically and reduce the number of mouse clicks you’re doing in the UI.
- You can find a link to my full code examples at the end of this article.
Step-by-Step Guide
1. The quick and dirty CLI method.
This method gives you the flexibility to upload your test data when you are ready and not have to upload it on deployment. I like this approach the best because you are able to keep a simple JSON file with your test data with your code and upload it whenever you want.
First you’ll need to create your DynamoDB table and deploy it:
export class DynamoDBStack extends Stack {
 constructor(scope: Construct, id: string, props?: StackProps) {
  super(scope, id, props);

  const customerTable = new Table(this, 'CustomerTable', {
   partitionKey: { name: 'id', type: AttributeType.STRING },
   tableName: 'Customers',
   pointInTimeRecovery: false
  });
 };
};
Deploy your app using the following command:
cdk deployNext create your cli-data.json file. It should look like this:
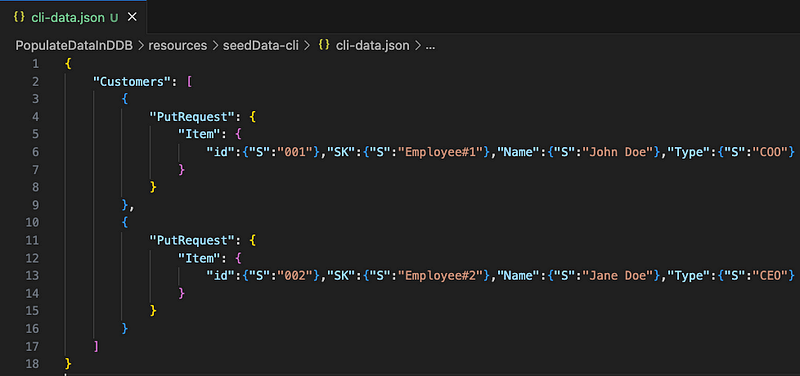
Once you’re ready to upload your test data to your table, navigate to the folder where your cli-data.json file is located and execute the following AWS CLI command:
aws dynamodb batch-write-item --request-items file://cli-data.jsonOutput:

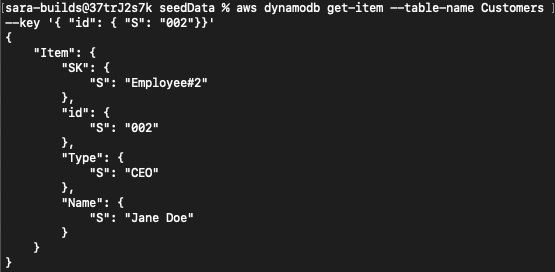
You can confirm that your data is present in the table by running a quick query:
aws dynamodb get-item --table-name Customers --key '{ "id": { "S": "002"}}'Output:
2. Using a JSON file Uploaded to S3
This is my second favorite way to upload the data because you are again able to keep a simple JSON file with your test data with your code, and the table population is taken care of during the Stack deployment.
The basic idea is that we have a JSON file that you’ll use in your project that will be uploaded to an S3 bucket. From there, the DynamoDB table will be populated with that file upon creation.
Start out by adding a JSON file named s3-data.json in your project that will contain your test data. The contents will look something like this:

NOTE: I recommend deleting the previous stack you created, since each of these examples use the same name for the DDB table. You may need to manually delete any of the AWS resources which were not automatically deleted with the Stack.
Next, create your S3 bucket where this file will be uploaded to:
const s3BucketUpload = new Bucket(this, 'SourceDataBucket', {
 blockPublicAccess: BlockPublicAccess.BLOCK_ALL,
 encryption: BucketEncryption.S3_MANAGED,
 enforceSSL: true,
 versioned: true,
 removalPolicy: RemovalPolicy.RETAIN,
});
Then add a BucketDeployment construct. This populates an S3 bucket with files from other S3 buckets or from your local. In this case, we’ll be using a file that we have locally.
We’ll also be adding a dependency to ensure the S3 bucket is created before trying to upload the file.
const bucketDeployment = new BucketDeployment(this, 'BucketDeployment', {
 sources: [Source.asset("./resources/seedData-s3/")],
 destinationBucket: s3BucketUpload
});

bucketDeployment.node.addDependency(s3BucketUpload);
Finally, we’ll create our DDB table and use the importSource prop to indicated that we want to use the json file we uploaded to our S3 bucket to populate our table.
NOTE: you’ll need to make sure you are matching the name of the partitionKey defined in the Table construct with the name you used in the s3-data.json file.
const customerTable = new Table(this, 'CustomerTable', {
 partitionKey: { name: 'id', type: AttributeType.STRING },
 tableName: 'Customers',
 importSource: {
  inputFormat: InputFormat.dynamoDBJson(),
  bucket: s3BucketUpload
},
pointInTimeRecovery: false
});

customerTable.node.addDependency(bucketDeployment);
Build and deploy your stack.


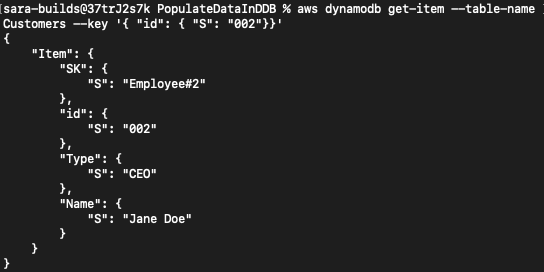
You can confirm that your data is present in the table by running a quick query:
aws dynamodb get-item --table-name Customers --key '{ "id": { "S": "002"}}'Output:
3. Adding data Inline Via Your CDK Code
This third way to populate data is not my favorite, but I want to give you the option anyways. I don’t like it because you add the test data directly inline with your code. To me, this makes the code messy and it’s not a best practice to include test data with your code. But hey, maybe you have some use case that I am unaware of for why this might work for you.
The gist here is that we’ll use a generic construct called AwsSdkCall and AwsCustomResource to make a call to DynamoDB to PUT the data in the table.
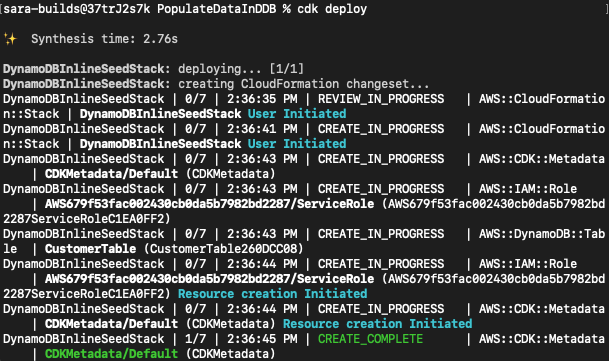
First you’ll need to create your DynamoDB table and deploy it:
export class DynamoDBInlineStack extends Stack {
 constructor(scope: Construct, id: string, props?: StackProps) {
  super(scope, id, props);

  const customerTable = new Table(this, 'CustomerTable', {
   partitionKey: { name: 'id', type: AttributeType.STRING },
   tableName: 'Customers',
   pointInTimeRecovery: false
  });
 };
};
Next you’ll need to create a constant of type AwsSdkCall in the same stack. This will include the parameters that are required in the API CDK will need to make to populate the data in DynamoDB.
const initializeData: AwsSdkCall = {
 service: 'DynamoDB',
 action: 'batchWriteItem',
 physicalResourceId: PhysicalResourceId.of(customerTable + "_initialization"),
 parameters: {
  TableName: customerTable.tableName,
  RequestItems: {
   "Customers": [
    {
     "PutRequest": {
      "Item": {
       "id": { "S": "001" },
       "sk": { "S": "Employee#1" },
       "name": { "S": "John Doe" },
       "type": { "S": "COO" }
      },
     }
    },
   {
    "PutRequest": {
     "Item": {
      "id": { "S": "002" },
      "sk": { "S": "Employee#2" },
      "name": { "S": "Jane Doe" },
      "type": { "S": "CEO" }
     },
    }
   }]
  }
 }
};
Finally in the same file, we’ll need to create a new AwsCustomResource construct. You can use this construct, in AWS’s words, “…to bridge any gap that might exist in the CloudFormation Coverage.” The calls are executed using a singleton Lambda function, so you’ll need to make sure the permissions you need are added to the Policy Statement.
const tableInitializationResource = new AwsCustomResource(this,'TableInitializationResource', {
 policy:
  AwsCustomResourcePolicy.fromStatements([
   new PolicyStatement({
    actions: ['dynamodb:BatchWriteItem',
     'dynamodb:DescribeTable',
     'dynamodb:Query',
     'dynamodb:Scan',
     'dynamodb:GetItem',
     'dynamodb:PutItem',
     'dynamodb:UpdateItem',
     'dynamodb:DeleteItem'
    ],
    effect: Effect.ALLOW,
    resources: [Fn.join(':', ['arn:aws:dynamodb', this.region, this.account, 'table/Customers'])],
   })]),
  onCreate: initializeData,
  onUpdate: initializeData
 });
 tableInitializationResource.node.addDependency(customerTable);
Build and deploy your stack.

You can confirm that your data is present in the table by running a quick query:
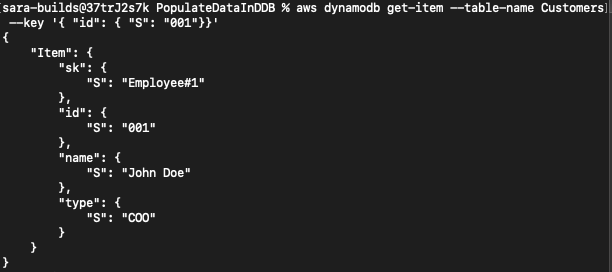
aws dynamodb get-item --table-name Customers --key '{ "id": { "S": "001"}}'Output:
Conclusion
As a recap, you can use any of these three methods to populate your DynamoDB table with test data. Having test data in your table is important when you’ve just created an API or are using other resources that leverage data and you want to make a test call to retrieve data.
As always, don’t forget to clean up the AWS resources you have deployed.
You can run:
cdk destroy STACK_NAMERemember there might be certain resources that are not automatically cleaned up that you may need to manually delete.
This could include: Cloudwatch Log Groups, DynamoDB tables, etc.
Find the Source Code Here: Repo
Thanks for reading and please give me a like if you’d like to hear more from me!
